
Understanding Backwater Valves
What is a Backwater Valve?
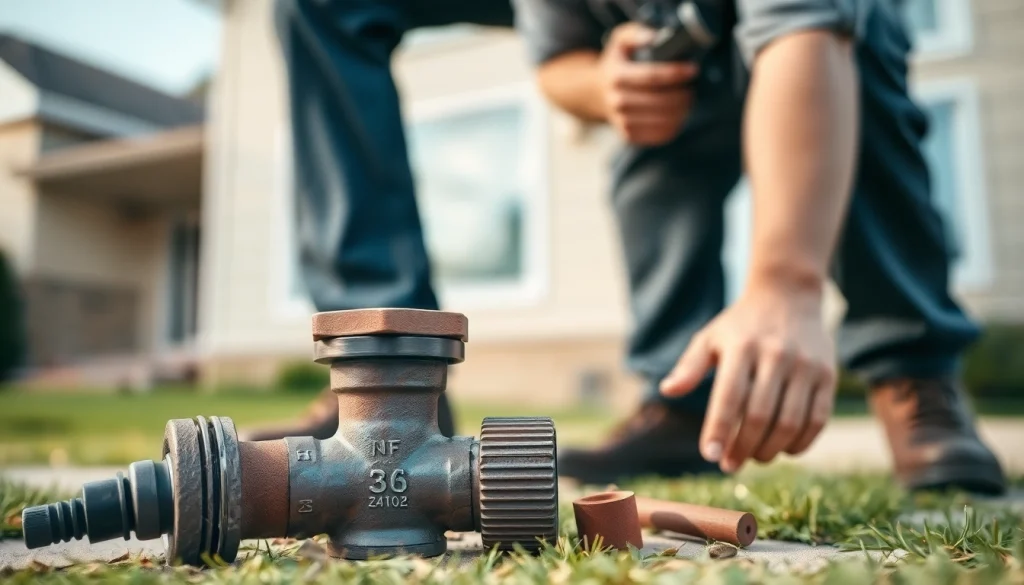
A backwater valve is a device installed in a home’s plumbing system to prevent wastewater from flowing back into the house. It acts as a barrier, allowing sewage to flow out but blocking any potential backflow caused by heavy rainstorms or municipal sewer overflows. This preventative measure is particularly critical in regions like Toronto, where the risk of flooding and sewer backups is heightened due to occasional heavy rains and melting snow.
Importance of Backwater Valve Installation in Toronto
In Toronto, the installation of backwater valves is not just a recommendation but a necessity for many homeowners. The city’s infrastructure can occasionally face heavy loads, especially during torrential rain or snowmelt, leading to potential backups in the sewer system. Such events can result in significant water damage, mold growth, and costly repairs. Therefore, investing in Backwater valve installation in Toronto serves as an insurance policy, safeguarding homes from flooding-related damages while also ensuring compliance with local plumbing codes.
How Backwater Valves Function
Backwater valves operate using a flap mechanism or gate. During normal operation, the valve is open, allowing waste to exit the home. In the event of backflow, the pressure from the incoming waste pushes the flap closed, sealing off the entrance to prevent contamination. Some modern valves come equipped with additional features such as alarms notifying homeowners of backflow incidents. This combination of mechanical function and technology ensures robust protection against sewer backups.
Preparing for Installation
Site Inspection and Assessment
Before proceeding with the installation, a thorough site inspection is vital. This process involves assessing the existing plumbing system, identifying ideal locations for the valve, and examining for any obstacles like tree roots or other interference. Not all homes are suitable for backwater valves due to structural differences, so understanding the specific layout of the plumbing system is essential. Homeowners should also check local building codes to ensure compliance with installation regulations.
Gathering Necessary Tools and Materials
The installation of a backwater valve requires several tools and materials, including but not limited to:
- PVC pipes and fittings
- A backwater valve unit
- Saw or pipe cutter
- Wrenches
- Drill and drill bits
- Concrete mix for sealing
- Safety gear (gloves, eye protection)
Having the proper tools at hand simplifies the installation process and ensures that the job meets quality standards.
Choosing the Right Type of Backwater Valve
Not all backwater valves are created equal. Homeowners should select valves that suit their specific needs based on their plumbing configuration. Common types include manual valves, which require user activation, and automatic valves that provide seamless operation without manual intervention. Consulting a professional can help determine the most effective type for individual circumstances and local code requirements.
Step-by-Step Installation Process
Executing the Excavation Safely
The first physical step in the installation process is excavation. This requires digging a trench to access the sewer line where the backwater valve will be installed. Safety protocols must be adhered to, particularly in ensuring that excavation sites are well-marked and that power lines or other underground utilities are not disturbed. Using proper excavation techniques prevents accidents and ensures a smooth installation.
Installing the Valve
Once the trench is prepared, the backwater valve is ready to be installed. Typically, the valve should be placed in line with the sewer system, ensuring that it fits snugly into the existing pipes. Proper alignment is critical; misalignment can lead to leaks or failure of the valve. Ensure that the valve opens in the right direction and illuminate any surrounding areas that may impede installation. Following manufacturer instructions will provide guidance specific to the valve being used.
Connecting to Drainage Systems
After the valve installation, the next step involves connecting it to the existing drainage systems. This might involve sealing joints with silicone or PVC cement, ensuring no leakage points exist. After connections are made, it’s imperative to allow adequate drying time based on the materials used. Inspect for any leaks before backfilling the trench to protect the work performed.
Maintenance and Troubleshooting
Regular Maintenance Tips for Backwater Valves
To maintain optimal functionality of backwater valves, regular inspection is key. Homeowners should clean the valve at least once a year, ensuring it is free from debris and buildup. Additional checks should include verifying the operation of any manual or mechanical features, as well as observing for outer damage or corrosion on exterior components. Keeping detailed records of maintenance can help track any recurring issues.
Common Issues and Solutions
Some common issues that might arise with backwater valves include:
- Blockages: If the valve becomes clogged, it may not close properly. Clearing obstructions can resolve this.
- Leakage: Gaps in joints may lead to leaks. Resealing connections with appropriate materials can fix this.
- Malfunctioning mechanisms: Automatic valves may fail if mechanisms jam; regular maintenance and line checks are essential to prevent malfunctions.
When to Seek Professional Help
While some maintenance and troubleshooting tasks can be performed by homeowners, certain situations warrant professional intervention. If the valve fails to open or close properly after DIY efforts, or if the plumbing exhibits severe backups, it is prudent to call in a licensed plumber. Professional assessments can save time and resources, as they have the appropriate expertise and equipment to address complex issues swiftly.
FAQs About Backwater Valve Installation
How often should I inspect my backwater valve?
Inspect your backwater valve at least once a year to ensure it functions properly and remains clear of debris.
What are the signs that my backwater valve needs servicing?
Signs include frequent backflow issues, unusual noises, or visible damage on the valve or surrounding plumbing.
Is professional installation necessary for backwater valves?
While DIY installation is possible, professional help ensures compliance with local codes and reduces installation errors.
Can I install a backwater valve in older homes?
Yes, backwater valves can be installed in older homes, but additional modifications may be needed for proper fitting.
What should I do post-installation?
After installation, test the valve by simulating heavy rainfall, and ensure that it operates smoothly without leaks.